Proper fix for "There was a problem starting C:\Windows\System32\LogiLDA.dll" error
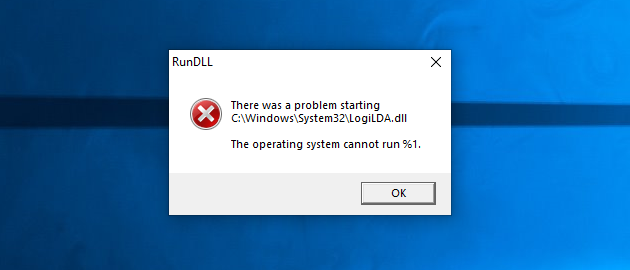
The error There was a problem starting C:\Windows\System32\LogiLDA.dll. The operating system cannot run %1. first appeared for me when upgrading from Windows 7 or 8/8.1 to Windows 10, but it recently popped up again when installing a new Insider Preview Build on my Windows 10. The error shows that Windows 10 is trying to find (but can't) a DLL file for a software, specifically for Logitech Download Assistant.
Logitech Download Assistant, as the name implies, is a software which assists with suggestions and driver downloads for Logitech products you have connected to your Windows 10 machine. Most likely, it came bundled up with a driver which you installed for a Logitech product - in my case, it was a Logitech K750 keyboard (specifically, the driver for the unifying receiver), but it can be a mouse in your case, or another Logitech product.
We'll cover here how to make the error go away and have Logitech Download Assistant work properly or how to disable the software from starting up and remove its registry entry in order to remove the start-up error message.
Make Logitech Download Assistant work on Windows 10
In order to make Logitech Download Assistant work properly, let's start with finding the "LogiLDA.dll" file that shows up in the start-up error message. Windows 10 does not seem to be able to find it at "C..." so there are two things you'll need to check:
1. Is your Windows 10 running on partition C?
Simply open a File Explorer (Win+E) and see if your Windows 10 is installed on partition C or a different partition. If Windows 10 is installed on partition C, then move on to number 2 below. If Windows 10 is running on a different partition letter, other than C, we'll need to adjust a registry setting for the LogiLDA.dll file to point to the proper partition:
- Open the Windows Registry Editor (regedit.exe) by simply pressing the Windows key (or click on Start) and typing regedit, then press Enter. Click Yes in the UAC prompt that follows.
- Navigate to Computer\HKEY_LOCAL_MACHINE\SOFTWARE\Microsoft\Windows\CurrentVersion\Run.
- In the right pane, double click on Logitech Download Assistant or right-click on it and choose Modify.
- Change the C partition from value data C:\Windows\system32\rundll32.exe C:\Windows\System32\LogiLDA.dll,LogiFetch to the actual Windows 10 partition on your PC.
In my case, Windows 10 was installed on partition F, so I changed that value data to F:\Windows\system32\rundll32.exe F:\Windows\System32\LogiLDA.dll,LogiFetch. Note that you need to change the partition in two places within that string.
- Close the Registry Editor and restart, or logoff and login again, to see if the error is gone.
If you still get this error and you're sure you did the steps above correctly, then move on to number 2 below.
2. Does the DLL file actually exist at \Windows\System32\LogiLDA.dll?
Open a File Explorer and navigate to \Windows\System32\ inside your Windows 10 partition and look for the& LogiLDA.dll file. Another quick way to see if the LogiLDA.dll file is there, is to click on Start and type LogiLDA.dll. If the file exist, you'll see one result and you can right-click the result and choose "Open file location" to confirm that the file is indeed located at the correct path. If no results are found, it means your current Windows does not have that file in the System32 folder.
One reason for the LogiLDA.dll file to be missing from the System32 folder is if Windows moved it to the Windows.old folder during an update. Check that by opening a File Explorer and navigate to Windows.old\WINDOWS\System32, within your Windows 10 partition, partition F in my case (LogiLDA.dll would not have appeared when you searched for it as instructed earlier).
If LogiLDA.dll is here, copy it from Windows.old/System32 to Windows/System32. You'll need administrator privileges for that and you'l probably get a quick UAC prompt to confirm the copy/paste operation.
Restart, or logoff and login again, and the error should be gone. (Side tip: Did you know you can create a shortcut for Log Off and place it on your Desktop?)
Disable Logitech Download Assistant from Startup and remove the error
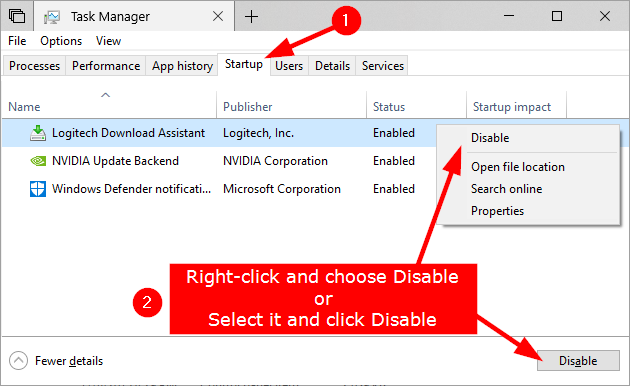
Right-click an empty space in the taskbar and choose Task Manager, then switch to the Startup tab. If the Startup tab does not appear here, it means you are looking at the Task Manager in a simplified view. Click on More details at the bottom left corner of the Task Manager window to switch to a more advanced view. Logitech Download Assistant should be there, in the Startup tab, and by right-clicking it, you can choose Disable.
This will prevent Logitech Download Assistant from loading and running in the background when Windows 10 starts and the popup error message will also not show up anymore.
At this point, you can also delete the associated registry entry, if you wish. To do so, you open the Windows Registry Editor (regedit.exe in the taskbar Search box), navigate to Computer\HKEY_LOCAL_MACHINE\SOFTWARE\Microsoft\Windows\CurrentVersion\Run and delete the Logitech Download Assistant string value from the right pane.
With this approach, the error is gone when Windows 10 starts and Logitech Download Assistant will not run in the background anymore, while the Logitech mouse or keyboard will still have its drivers installed and will continue to work as normal.
I hope this works for you, but if you have a better/different solution, do let us know in the comments bellow.


