How to Extract an ISO (Disk Image File) in Windows 8 and 10 using the Built-In Mount Option
So you've got an ISO image file and you want to extract the contents of it to your hard drive. This is a simple task that has become even simpler in recent versions of Windows, so it won't take more than few steps. Of course, there are multiple ways to do this, so we'll cover the best options starting with the easiest, and from there you can choose your preferred method. With that, let's get started:
Extracting an ISO in Windows 8, 8.1, and 10 – Using the Mount and Copy Method
Previously you needed to install third-party apps to mount, extract, and otherwise manage ISO files in Windows. Starting with Windows 8, Microsoft began including native ISO support within the right-click shell menu. This means you can now mount an .ISO directly from the right-click menu with no third-party software needed, like this:
1. Right-click the .ISO file you want to extract, and click Mount, as shown below:

2. Once the .ISO is mounted, you'll see its contents displayed in an Explorer window. From there you can press CTRL+A or right-click the window background, and choose Select all to highlight all of the files in the .ISO. With the files highlighted, you can press CTRL+C or right-click the window background and choose Copy.
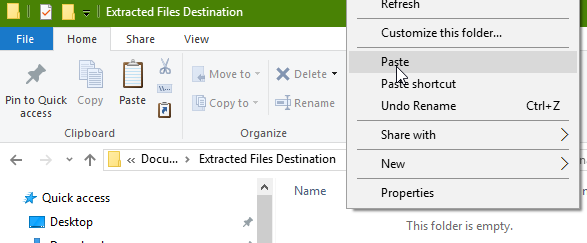
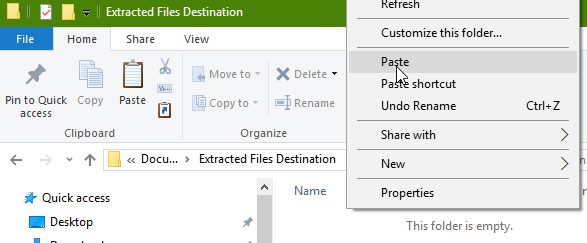
 3. With the files in the .ISO file copied to your Windows clipboard, open a different Explorer window and navigate to the folder you want to Paste the files into. Click on an empty spot in the destination folder and press CTRL+V or right-click the window background choose Paste:
What to do if you don't have the Mount menu option?
If you're using a newer version of Windows (8 and up) and you don't see the Mount option in the right-click menu as shown above, that means another program has been associated with .ISO files and you need to associate them with Windows Explorer instead. To fix this problem, follow this simple guide to restore the Mount option to the right-click menu. Alternatively, here's a quick summary of how to do it:
1. Open an Explorer window and right-click on any .ISO file. Click Properties at the bottom of the right-click menu.
2. Under the General tab (which should appear first by default), click the Change... button. Choose the Windows Explorer option then click OK:
You should now see the Mount option at the top of the context menu when right-clicking an .ISO file in Windows Explorer. However, sometimes after changing the file associations you may have difficulty using the Mount menu option due to the following error message appearing after clicking Mount:
“Couldn't Mount File: Make sure the file is in an NTFS volume and isn't in a compressed folder or volume.”
Fortunately, this is a very easy fix. All you have to do is drag the ISO you're trying to extract into another local disk, as shown below. For example, if the .ISO is stored on (C:) drive (which most Windows files are) then you would just copy it over to (D:) drive and then right-click and mount it from there. To do that, just click on the ISO file and hold the mouse button down while dragging the file into another Explorer window displaying (D:) drive, then release the mouse button to drop a copy of it into (D:) drive:
With the tips above you should be able to easily mount any .ISO file using the built-in Mount option in the right-click menu. Once the ISO is mounted you can access the files in Windows Explorer by clicking on the new drive letter and .ISO name:
You can then select the files you want to extract by holding CTRL while clicking each file, or select all by right-clicking the window background and choosing Select all from the menu. Once the contents of the .ISO file are selected, right-click the selection and select Copy:
Now just right-click anywhere in your destination folder and choose the Paste option to extract the files from the ISO into a regular folder on your hard drive. If you'd rather use a third-party app to simplify the process, continue reading because the same apps used in Windows 7 are usable in Windows 10.
To Unmount the drive simply right click on it in Explorer and then select Eject:
That's it.
Now how about third party software to do the same? Here's how to Extract an ISO in Windows 7 and Older – Best Third-Party Apps. Those apps work just fine in windows 8 and 10 as well, if the native "Mount / Copy / Paste" option has failed you.


