What is the SFC Command and How to Run in Windows 10
If you've been noticing that Windows 10 hasn't been working properly on your machine, one of the potential solutions you can use to diagnose and fix the problem is the System File Checker (SFC) command-line utility. This nifty tool is able to find and repair corrupted and missing system files, thereby restoring your operating system to the way it was originally designed to work.
When you start noticing problems during a boot or certain components in Windows 10 aren't behaving right, there's a possibility that one or a few system files are corrupted or missing. Normally Windows 10 system files don't just stop working or disappear on their own, but issues can be caused by updates, drivers, and even certain applications.
Fortunately, the SFC command-line utility is easy to use and can scan the integrity of system files to automatically replace any that are found to be damaged or absent. The SFC tool replaces files with the most recent reliable versions to ensure compatibility.
Now that you know what this utility is and when you should use it, below we'll show you exactly how to run and use the SFC command in Windows 10.
Note: We highly recommend you make a full backup and/or create a new system restore point before making any changes to the file system with the SFC command. That way you'll be able to revert to the previous state if anything goes terribly wrong.
How to Run an SFC Scan in Windows 10
Although SFC is typically recommended as a way for advanced users to check for file system corruption, anyone with basic computing skills can run a scan by following these steps:
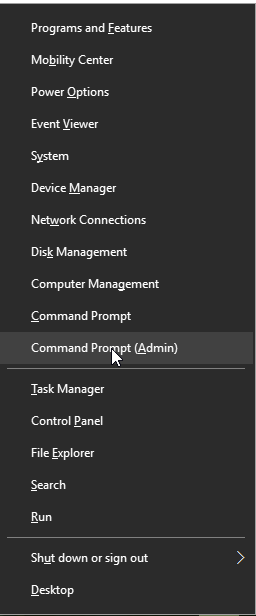
1. Click the Windows Start Menu icon and then type 'Command Prompt' in the Search Bar and choose the Command Prompt (Admin) option. You can also right click the Command Prompt option and select “Run as Administrator.” Alternatively, another fast way to open the command prompt is to use the hotkey Windows key + X to open the Windows Power User menu.
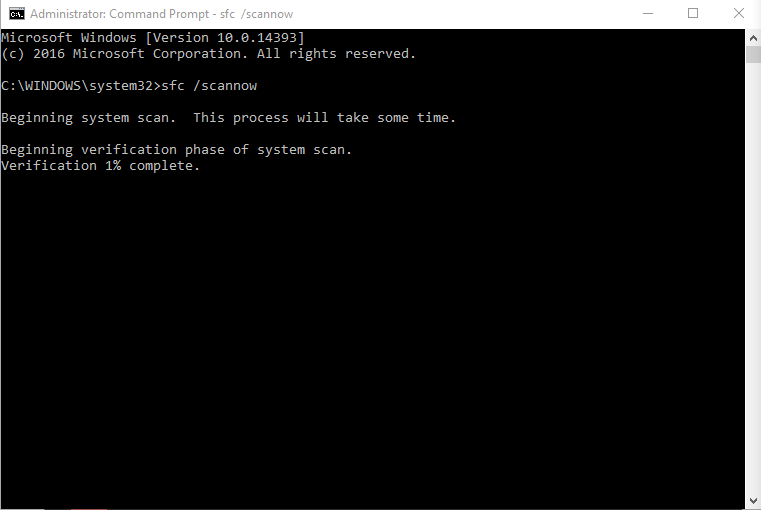
2. After the Command Prompt window appears, type 'sfc /scannow' and press Enter. Make sure you insert a space between SFC and the slash symbol, as shown below, otherwise the command will not work.
3. Allow some time for the scan to finish. It will usually take between 5 to 15 minutes.
4. After the scan is finished, you'll see one of the following results:
-
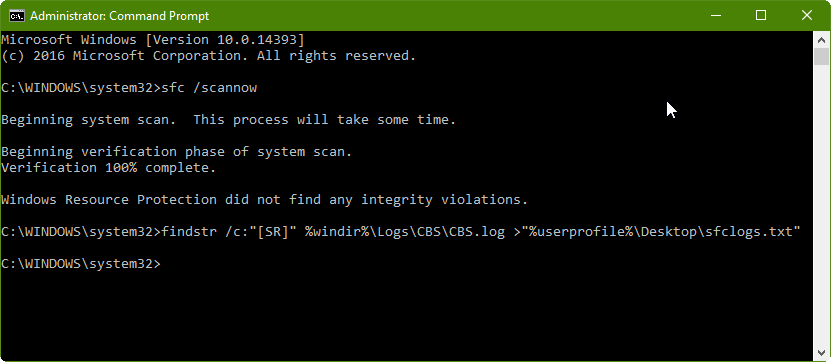
“Windows resource protection did not find any integrity violations” - The utility was unable to find any corrupt or missing system files.
-
“Windows Resource Protection could not perform the requested operation” - There was an unexpected error during the scan. If you see this message you should try running an offline scan, which is a process that we'll cover later in this guide.
-
“Windows Resource Protection found corrupt files and successfully repaired them. Details are included in the CBS.Log %WinDir%\Logs\CBS\CBS.log” - This is the ideal response as it means SFC was able to find and fix problems. If you see this message, check to make sure your system is working properly and if not then resort to additional repair or restore measures mentioned below.
-
Windows Resource Protection found corrupt files but was unable to fix some of them. Details are included in the CBS.Log %WinDir%\Logs\CBS\CBS.log” - If you see this message then you may need to repair the corrupted files manually, but no worries we'll explain how to do that later.
Bonus Tip: It's a good idea to run the scan three times consecutively, as it can sometimes catch additional file system problems. Make sure Fast Startup is disabled and restart the computer after each scan.
How to View SFC Scan Logs in Windows 10
If SFC is unable to fix problems it has found or you're curious about which problems it has fixed, you can use the scan logs to learn the specifics. The fastest and easiest way to access the log is to use the Command Prompt to create a readable copy by following these steps:
1. Press Windows key + X to open the Windows Power User menu and then choose the Command Prompt (Admin) option (as shown in the screenshot above).
2. Type the command below in the command prompt window and press Enter:
findstr /c:"[SR]" %windir%\Logs\CBS\CBS.log >"%userprofile%\Desktop\sfclogs.txt"
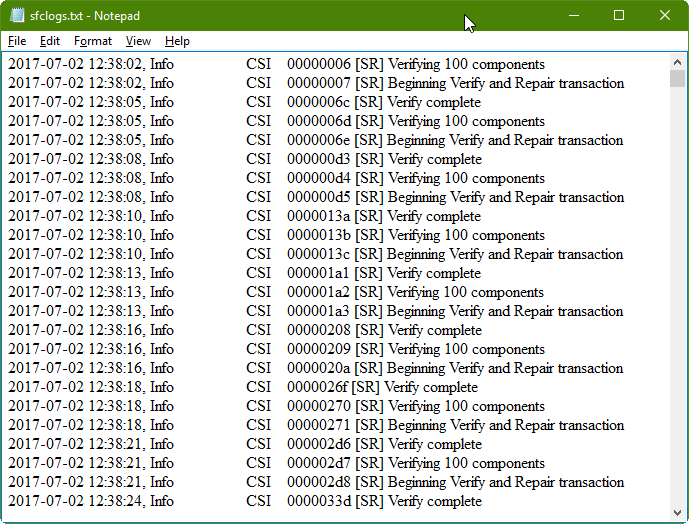
3. After running the above command you won't see any message returned within the command prompt, but you should now see a file called “sfclogs.txt” on your desktop. Open that file with Notepad and you'll see a long list of the components that were verified and/or repaired during the scan. If no errors were found then these logs won't be of much use, but when SFC can't fix the problem, viewing the log is an essential part of finding out which system files couldn't be repaired so that you can take steps to repair them manually.
How to Scan and Repair with SFC While Offline in Windows 10
Some system files are protected from being modified while Windows is running. Since these files are utilizing memory while the operating system is active, you'll need to launch Windows with just the command prompt by following these steps:
1. Press the Windows key + I to bring up the Settings app window.
2. Select Update and Security.
3. Click on Recovery.
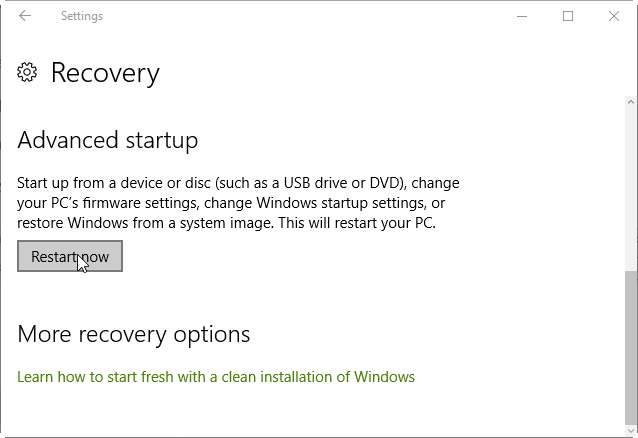
4. Click the Restart Now button under Advanced Startup.
5. Next select the Troubleshoot option.
6. Click Advanced options
7. Select the Command Prompt option to boot with only the Command Prompt running.
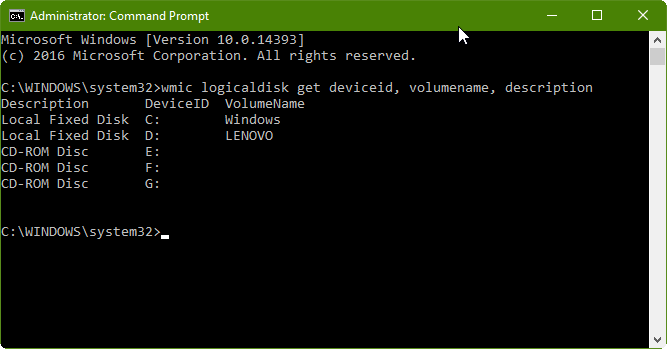
8. After booting you'll see the Command Prompt window. Enter the command below to discover the drive locations of the System Reserved partition and the Windows system/installation files:
wmic logicaldisk get deviceid, volumename, description
The above command will show you a list of your drives and which file systems are on each. This is important to note because you will use this information to specify drives in the next step.
9. Now that you have the drive locations of Windows and the System Reserved partition, enter in this command:
sfc /scannow /offbootdir=D:\ /offwindir=C:\Windows
In the above command, we've used the /offbootdir switch to specify that D:\ drive is the location of the System Reserved partition (which in our case is entitled 'Lenovo') and the /offwindir switch to specify that C:\ drive is the location for the Windows files. However, the drive location will vary depending on your computer's setup, which is why it's necessary to request the locations using the command in step 8.
10. After the scan is done you can exit the Command Prompt window and then click Continue to go back into Windows 10.
Resorting to Manual File System Fixes
If the SFC command was unable to fix the problem(s) found, you may need to take steps to repair the corrupt and damaged files manually. Start by checking the sfclogs.txt file to see which files need to be repaired. After that you can use a search engine like Google to look up more information about the corrupted files and where they belong in the file system.
You can also download a good copy of the files from another machine running Windows 10, if you'd prefer not to download them online. Once you've obtained proper copies of the system files you need to repair, all you have to do is replace them manually by following these steps:
1. Press the Windows key + X hotkey combination to open the Power User menu and click the Command Prompt (Admin) option.
2. Next you'll have to take ownership of the corrupted system file so that it can be replaced. To do this, the following command into the command prompt and press Enter:
takeown /f C:\File-Path-and-Name
Important: In the above command you'll need to replace “C:\File-Path-and-Name” with the name of the file path and name of the system file you're trying to repair. For example, C:\Windows\System32\corruptedfile.dll.
3. Then you'll have to allow full admin access to the file you're replacing by typing the command below and pressing Enter:
icacls C:\File-Path-and-Name /Grant Administrators:F
4. Finally, replace the corrupted file with the a good copy by typing the command below into the command prompt and pressing Enter:
copy C:\Source-Path-and-File-Name C:\Destination-Path-and-File-Name
Important: You'll need to replace C:\Source-Path-and-File-Name with the location of the good file and replace C:\Destination-Path-and-File-Name with the location of the corrupt file.
5. After entering the replacement command above you'll have to confirm by typing Yes and pressing Enter.
Once you've replaced the corrupt files you can verify that the problems have been fixed by using the SFC /verifyonly command to run a scan. You could also verify each file individually by typing the following command and pressing Enter:
sfc /VERIFYFILE=C:\File-Path-and-Name
To see a complete list of the commands available to you within Windows 10 you can type the sfc /? command and press Enter.
Also, if none of the above solutions are successful in fixing the problem you're having, the next step would be to use the Deployment Image Servicing and Management (DISM) command-line utility.

