How to Install Windows 8.1 Virtual Machine on Windows 7
If you aren't a huge fan of Windows 8, and would rather go with it's predecessor for your primary OS, there's nothing wrong with that. However, it can cause some inconveniences, and sometimes it's nice to have the option of going into Windows 8 for a bit. This can be done easily with the use of VMWare Player, a free to use program that allows users to create virtual machines with different operating systems.
This tutorial will teach you how to set-up your Windows 8.1 virtual machine. However, to do this, you'll need a valid Windows 8/8.1 installation disc/ISO file, as well as a license.
1. First, you'll need to download and update VMWare Player (d3k link). Simply download the installation file, run it, and open VMWare Player when finished. You will need to make sure you have all of the latest updates as well (the program will automatically prompt you to install them).
2. In VMWare Player, click the button that says "Player", go to the File menu, and select the "New Virtual Machine" option.
3. If you are installing Windows 8/8.1 with a CD, select the "Installer disc" option and select the drive with the CD in it from the drop down list. For those using an ISO, select the "Installer disc image file" option, click Browse, and find your ISO file. Once you've selected the proper option, click Next.
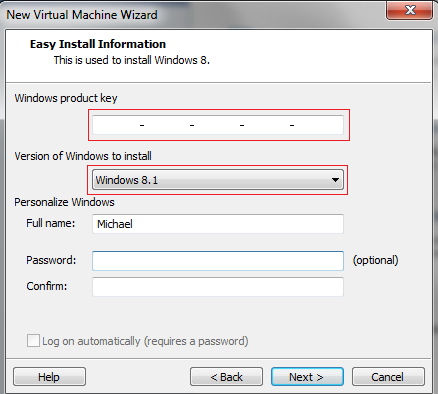
4. Enter your Windows product key on the next screen. Also, make sure that the "version of Windows to install" is set to Windows 8 or 8.1, depending on which CD or ISO file you are using. You can also enter the administrator username and password on this screen. When finished, click Next.
5. Give your VM a name on the next page. It doesn't really matter what you name it, and it can be re-named later. You can also set a location for it on your hard drive. If you don't have a preference, the default location is fine.
6. The next screen will ask how much of your hard drive you want to allocate to your VM. You can adjust this to your liking, but the recommended is usually more than enough.
7. You'll be brought to a review of your VM. On this screen, you can click "Customize Hardware" to give your VM a bit more power. You will need to know your PC hardware in order to properly customize this without making it in-operable. However, the default settings are typically enough to perform basic functions of the OS. When you are all done, click "Finish", and VMWare will begin preparing your virtual machine.
8. Once VMWare Player has finished setting up your VM, it will automatically open up and bring you to the Windows 8 set-up wizard. The first page will have you select a version, click next, and it will begin installing windows (this will take a while). Don't worry if your VM resets during this process, or if you end up at a black screen with a small windows icon.
9. The rest of the installation process should be completely automated. Just allow Windows and VMWare Player to take care of the rest. Your VM might boot up into Windows 8/8.1 and install the VMWare Player Tools and then restart again -- once it boots up, you'll be ready to use your VM.
VMWare Player Tips
If you look at the top of your screen, you'll see a few little VMWare Player options.
- The "Player" button brings up the main menu where you can close your VM, etc.
- Next to it, you can pause your VM to increase performance on your primary OS without completely shutting down your VM.
- Next to that, sends a "Ctrl + Alt + Delete" command to your VM. This is useful for accessing task manager and other functions. If you try to push those buttons, it won't work, and instead use it on your primary OS. You must press "Ctrl + Alt + Insert" to use that command in your VM.
- The next button puts your VM into full screen mode.
- The final button goes into "Unity" mode, which is a bit more advanced.
Be sure to leave any comments and questions below!


